Showing posts with label ubuntu. Show all posts

Monday, October 18, 2010

How to convert *.rm to mp3 on Ubuntu

This is yet another HOW to on converting Real Media files in *.rm format to mp3 format.

Step 1: copy and paste this text in a file and save it as 'rm2mp3' w/o the quotes 
---------------------
#!/bin/sh
inputfile=$1
inputfilename=`basename $1 rm`
ext='mp3'
outputfilename=$inputfilename$ext

echo 'CONVERTING TO WAV FORMAT'
mplayer $inputfile -ao pcm

echo 'CONVERTING WAV FORMAT TO MP3'
lame -h -b 256 audiodump.wav $outputfilename

rm -f audiodump.wav

echo 'DONE...!'
----------------------------------------------

Step 2: Change permissions to execute the file. Do the command :
$chmod 777 rm2mp3

Step 3: Then execute the script with the command:
$./rm2mp3 filename.rm

Where filename.rm is the input file.

Step 4: The folder that had the *.rm file has the converted mp3 file.
Step 5: Enjoy listening!

Happy Hacking!

PS: This Tutorial was found here. Thanks a lot! That helped me a lot!

Tuesday, September 7, 2010

How to convert wma files to mp3 on Ubuntu

Do you sync your iPod/iPhone with Rhythmbox/Amarok on Ubuntu and grouse about the lack of auto conversion capability of Windows media audio(*.wma) files to mp3 in Rhythmbox?
Then here is a simple hack, but not completely automatic like in iTunes.

Step 1: Install LAME {Lame is ain't a mp3 encoder}
from the Synaptic package manager by doing so:

System->Administration->Synaptic Package manager

Type lame in the search box. Then install the package(Fig 1).


Fig 1: Install LAME

Step 2: Install Nautilus Audio converter script
After installing LAME, install 'nautilus audio converter script'.

Type 'nautilus audio' in the search box. Then install the package(Fig 2)

Fig 2: Install 'nautilus audio converter script'


Step 3: Choose file to convert to mp3
After you're done with the installing, choose the file you wish to convert, by right clicking on the desired file. Then hoover over 'scripts' which has the audio converter script installed. Choose 'Audio files converter'(Fig 3).


Fig 3: Choose files to convert

Step 4: Choose extension
As in this case its mp3(Fig 4)


Fig 4: Choose Extension

Step 5: Select quality
By Default it would be 'extreme' and its recommended.

Fig 5: Choose quality

Step 6: Enter meta-tags
If you wish to do so, work around with this, else just click OK.

Fig 6: Enter meta-tags

Step 7: Voila! your files are converted!
Make sure you have the files in /home/XXX/music folder, so that Rhythmbox populates your play-list automatically.

Hope this worked for you, leave a comment any ways!

Happy Hacking!

Thursday, November 12, 2009

Grub error 15 on a 2 HDD box[solved]

Do you get Error 15(file not found) while loading Grub on your 2 HDD box?
Then here is the solution.

Grub Error 15 is commonly found when Grub is unable to find vmlinuz(the kernel image). In such a case just boot from a live cd and do the following

$sudo grub

this command enters grub,once that is done,enter

find /boot/grub/stage1

This will return the location of the root ex: (hd0,4)

Now you need to edit the Grub's menu.lst
if running through a Ubuntu Live cd then the command:

$sudo gedit /media/disk/boot/grub/menu.lst

menu.lst may look like this:

title Ubuntu 9.04, kernel 2.6.28-11-generic
root (hd0,4)
kernel /boot/vmlinuz-2.6.28-11-generic root=/dev/sda5 ro quiet splash
initrd /boot/initrd.img-2.6.28-11-generic


if this is the case then ,just replace the (hdx,y) with device UUID.

to get the UUID:

$blkid

will give you the uuid of all the partitions on the disk.

search for the partition with ext3/4 and copy it(in my case (hd0,4) /dev/sda5 uuid=.....)

now replace the line in menu.lst where (hdx,y) appears

ex: root (hd0,4)

the entry in menu.lst should look like this after the edit

title Ubuntu 9.04, kernel 2.6.28-11-generic
uuid ee9fd0b7-29c5-42a4-a606-9342fae9523a
kernel /boot/vmlinuz-2.6.28-11-generic root=UUID=ee9fd0b7-29c5-42a4-a606-9342fae9523a ro quiet splash
initrd /boot/initrd.img-2.6.28-11-generic


observe that even the line with 'kernel' has been replaced with the respective uuid.

now save it and reboot.

and voila! tell me what happens!

Tuesday, September 15, 2009

How to install Seesmic desktop/Tweet deck on Ubuntu

Ubuntu users who want either Seesmic desktop or Tweet deck on their Ubuntu box here is a small procedure:
  1. Open the Terminal
  2. Use wget to download http://airdownload.adobe.com/air/lin/download/1.5/AdobeAIRInstaller.bin
  3. Set the file to be executable: chmod +x AdobeAIRInstaller.bin
  4. Run it: sudo ./AdobeAIRInstaller.bin
  5. Accept any AIR updates
  6. Use wget to download Seesmic Desktop from http://d.seesmic.com/seesmic/SeesmicDesktop-0.2.1.air
  7. On the Ubuntu desktop, not terminal, look under Applications->Accessories or Applications->Other for Adobe AIR Application Installer and run it
  8. Select SeesmicDesktop-0.2.1.air and the normal Seesmic Desktop installer will run
Almost the same procedure for Tweet deck ,once Adobe AIR is installed.

I found this very helpful article here. Thanks!

Thursday, May 7, 2009

How to play Moser Baer DVDs on Ubuntu 9.04

I observed that some people were facing issues while trying to play a Moser Baer (Super DVD) movie DVD on Ubuntu 9.04.
Some times even though all codecs are installed, somehow VLC/totem wont play the DVD. The only suggestion to fix this is to do this:

Go to VLC media player

tools>preferences> videotab
and set the video output to X11 video output.
This *may* help to play those DVDs.

Sunday, April 26, 2009

Automount Hard disk on Ubuntu 9.04

I found that Ubuntu 9.04 wasn't auto-mounting hard disk drives on boot.In earlier versions I had to edit /etc/fstab to mount itself on boot.This was quiet tricky as messing with fstab wasn't a good idea.But in this release its lot easier.
In a terminal enter

$sudo apt-get install pysdm

[or it can done through synaptic also]


then in the terminal enter
$pysdm

then the gui pops up and select all the drives you wish to mount on boot and you are all set!

Saturday, April 25, 2009

Amarok 2 unable to play audio files on Ubuntu 9.04-Solved

Soon after upgrading to Ubuntu 9.04(Review coming soon!) I found that Amarok 2 was unable to play any kind of audio files.

When I opened amarok from a terminal I was getting this error

[snip]
link XMLID_7_ hasn't been detected!
Couldn't resolve property: radialGradient3986
[/snip]


Some threads suggest to install phonon-xine-backend, but Kubuntu is already shipped with phonon backend.

After posting my problem in launchpad I found this solution
just type this in a command line

[code]
sudo apt-get install libxine1-ffmpeg
[/code]

then Amarok will be back in full swing!

However I'm not all that satisfied with Amarok 2 as I was with earlier versions.
Any way I hope this helps somebody.

Monday, March 2, 2009

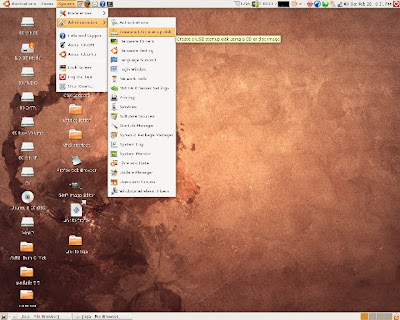
USB Ubuntu 8.10 install:tutorial


Every time Canonical Inc comes up with a new release candidate of Ubuntu, it keeps getting better. Even with Interpid Ibex 8.10 its no different. This tutorial shows 'How to' install Ubuntu 8.10 on to a flash media and carry it in your pocket. Earlier I had done a 'How to' install Ubuntu 7.10 on a USB which was completely through command line . Now that Ubuntu 8.10 has new feature of doing it through the GUI, I thought it was worth doing a post. The best part about making USB boot disk is that you dont really need to install it to do all this. A simple Live Cd will do the trick. So here it is:


Step1:System->Administration->Create a USB boot disk


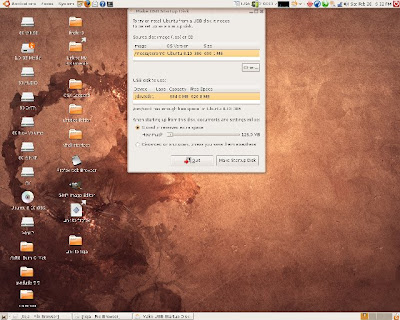
Step2:Insert Ubuntu X.XX CD(haven't checked for other distros)


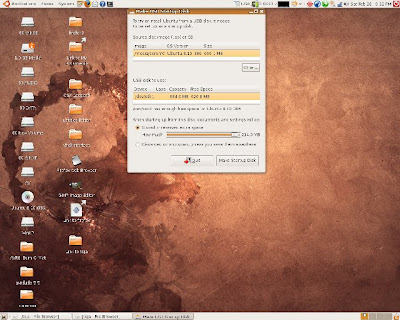
Step3:Insert Flash drive and set space required for persistent feature


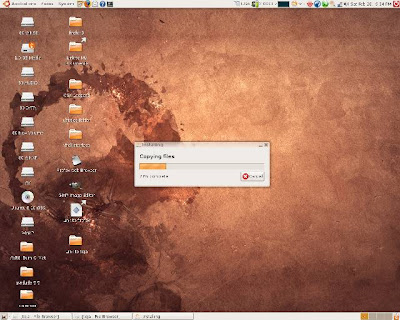
Step4:Watch it happening


Step5: After completed reboot from USB or insert USB elsewhere and boot from USB.

I wish you Happy Hacking!

Tuesday, November 4, 2008

Ubuntu 8.10 reviewed


The new Desktop effect on Compiz and a KDE 4.1 Desktop sporting new look.

This weekend (1st Nov) I upgraded to Ubuntu 8.10, which took a staggering 10 hours to update my box which hosts both KDE and Gnome. So I thought to review Ubuntu as a simple end user. Here it is

Firstly the things I liked:
  • Amazingly fast boot/shutdown time
  • KDE 4.1
  • Good looking art work for both KDE/Gnome
  • Slightly new Compiz effects
Then comes the things which make Ubuntu 'Rocking' always:
  • Superb driver support
  • Easy up-gradation/installation feature
  • Quick fresh install feature
  • Vast repositories
  • Amazing media rendering/acceleration with Amarok
In the end some things which makes any Ubuntu user 'Irksome'/'Pissed off'!
  • Kaffeine is gone for now.I dont know why KDE ditched Kaffeine and replaced it with some 'Dragon player'.
  • Hell long updating time! It took around 10 hours for me to update. I've seen even Vista taking such humongous time to update but I like Ubuntu and I want to it to make me feel 'GOOD' ;)
  • Initial glitches with sound I face every time I upgrade to new release.
  • Dirty looking GTK apps on KDE.
  • A difficult to remember keyboard layout for Kannada( in general Unicode).

Monday, April 28, 2008

Sound lost on uprgrading ubuntu 8.04-solved

After I upgraded to Ubuntu 8.04, I lost sound on my comp.
When I checked with kernel options like

$lspci
$lshw -c sound

every thing seemed to be fine, but still I wasn't able to hear any sound.
Then just tried this command

$alsamixer

and increased all the values to maximum. Then

Bingo! here comes the music

Ps: caution with those values as making those high gives an ugly squeak in your speakers.

All thanks to ubuntu forums for the support.

Friday, October 19, 2007

USB Ubuntu 7.10 Gutsy Gibbon install tutorial

This is a tutorial which helps you to put Ubuntu 7.10 on to your USB flash drive.

This content is copy righted material from www.pendrivelinux.com.

Do try it out and enjoy carrying Ubuntu anywhere you want....!

----------------------------------------------------------------------------------------------------

USB Ubuntu 7.10 install from Linux: This tutorial enables you to install, boot and run Ubuntu 7.10 (Gutsy Gibbon) from USB. In addition to installing Ubuntu to a USB device and then booting Ubuntu from USB, this tutorial will enable you to automatically save your changes and settings back to the stick and further restore them on each boot using a second "casper-rw" persistent partition. The tutorial was written for those already familiar with working from Ubuntu or another Linux desktop environment. If you do not have access to or prefer not to use a Windows computer, this Ubuntu Linux on a stick tutorial is for you.

Ubuntu 7.10 takes slightly longer to boot than previous releases. However, once it's up and running, it performs much better than running from the Live CD.

USB Ubuntu 7.10 Essentials:

  • Ubuntu7.10 ISO
  • CD Burner
  • 1GB USB flash drive (2GB+ recommended)
  • U710fix.tar

Ubuntu 7.10 USB installation tutorial:

Hint: You can drastically speed up the install by Copying (Ctrl+c) and Pasting (Ctrl+v) commands into the terminal instead of manually typing them out. With the exception of replacing X with your drive letter.

  1. Grab the Ubuntu 7.10 ISO and burn it to a CD
  2. Insert the CD and your USB flash drive
  3. Reboot your computer into Ubuntu from the Live CD
  4. Open a terminal window and type sudo su
  5. Type fdisk -l to list available drives/partitions. Note which device is your flash drive (example: /dev/sda) Throughout this tutorial, replace x with your flash drive letter. For example, if your flash drive is sdb, replace x with b.
  6. Type umount /dev/sdx1
  7. Type fdisk /dev/sdx
    • type p to show the existing partition and d to delete it
    • type p again to show any remaining partitions (if partitions exist, repeat the previous step)
    • type n to make a new partition
    • type p for primary partition
    • type 1 to make this the first partition
    • hit enter to use the default 1st cylinder
    • type +750M to set the partition size
    • type a to make this partition active
    • type 1 to select partition 1
    • type t to change the partition filesystem
    • type 6 to select the fat16 file system
    • type n to make another new partition
    • type p for primary partition
    • type 2 to make this the second partition
    • hit enter to use the default cylinder
    • hit enter again to use the default last cylinder
    • type w to write the new partition table
  8. Type umount /dev/sdx1 to ensure the 1st partition is unmounted
  9. Type mkfs.vfat -F 16 -n ubuntu710 /dev/sdx1 to format the first partition
  10. Type umount /dev/sdx2 just to ensure the 2nd partition is unmounted
  11. Type mkfs.ext2 -b 4096 -L casper-rw /dev/sdx2 to format the second partition
  12. Remove and Re-insert your flash drive
  13. Back at the terminal, type apt-get update
  14. Type apt-get install syslinux mtools
  15. Type syslinux -sf /dev/sdx1
  16. Type cd /cdrom
  17. Type cp -rf casper disctree dists install pics pool preseed .disk isolinux/* md5sum.txt README.diskdefines ubuntu.ico casper/vmlinuz casper/initrd.gz /media/ubuntu710/
  18. Ignore any "cannot create symbolic link" errors

  19. Type cd /home/ubuntu
  20. Type wget pendrivelinux.com/downloads/U710fix.zip
  21. Type unzip -o -d /media/ubuntu710/ U710fix.zip
  22. Restart your computer, set your BIOS or Boot menu to boot from the USB device and reboot again.

You should now have a USB Ubuntu 7.10 Gutsy Gibbon flash drive that should automatically save your changes, restoring them on boot.

Note: If your having trouble getting Ubuntu to boot, your memory stick may have a corrupted MBR. To repair the MBR of your USB device, at the terminal type sudo apt-get install lilo then type lilo -M /dev/sdx (replacing x with the letter of your flash device)

Ubuntu® is registered trademark of Canonical ltd.

©2006-2007 Pen Drive Linux Credits and Resources
Linux is a registered ™ of Linus Torvalds.

Saturday, July 28, 2007

0 to Ubuntu in 3 minutes!

Yeah that's true. You may have heard "0 to Linux in 5 minutes"(TM Knoppix) from Klaus Knopper but this time it's "0 to Ubuntu in 3 minutes!". My many day old dream of booting Linux from my USB came true , finally! It was possible only because of a rare combination of Funds+Time+Sources.

Initially I'd thought of making my USB stick to boot PCLinuxOS(the second best Distro) but then couldn't succeed then tried Knoppix again failed since My laptop didn't have the right driver to boot Knoppix. Then tried Fiesty Fawn ,again faced compatibility errors.I also tried to make the boot stick from windows and tried to port Slax, That also failed. Later succeeded with Ubuntu 6.06 LTS. It just boots quickly within 3 minutes and 'viola' you are all set to use it!
Though the usb boot concept is now a pretty old one I'm feeling so happy that I was able to do it finally.
Thus all the credit should go to :
1]www.pendrivelinux.com(main source)
2]www.launchpad.net(for answering my pesky questions)
3]The open source world(for making such an amazing project)
4]My Brother(for his suggestions and for answering my crazy doubts)

Vroooooooooooooooom

Saturday, April 7, 2007

Windows Vista vs Beryl on Ubuntu...


This video shows the Aero effect on windoze and Beryl on Ubuntu, its very good simply because the Beryl Project is itself amazing!
Here's a Howto Install Beryl on your (K)Ubuntu desktop. click here